ALBERTO GUERRERO/iStock/GettyImages
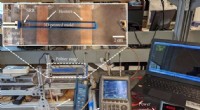
Secure the step‑up transformer to the left corner of the plywood. Use a pencil to mark the screw holes through the transformer, then drill matching holes in the plywood. Tighten the transformer in place with metal bolts.
Wrap the copper tubing into a flat spiral. Leave a 6‑inch straight tail after the final outer turn. Ensure the inner diameter is 6 inches and the spacing between turns is ¼ inch.
Position the coil at the right corner of the plywood, aligning its tail toward the transformer. Drill a ¼‑inch hole next to the coil’s inner end, thread the tubing through, and secure it.
Measure 1 inch from the mailing tube’s end and drill a hole. Thread the copper wire through, leaving a 6‑inch slack tail. Wind 1,000 feet of wire onto the tube, then make another hole near the end and thread the wire’s tail through.
Drill a 1/16‑inch hole through the center of the primary coil. Slide the secondary coil through this hole and cement it in place. Place the top electrode over the secondary coil and connect it to the coil wire.
Insert the automotive battery into the holder and position it adjacent to the plywood.
Hammer one end of the copper pipe shut. Mount two pipe sections on lumber and fasten them. Attach the assembly to the plywood’s bottom‑right corner. Loosen the pipe fasteners and adjust the gap to approximately ¼ inch.
Shape a 10‑AWG wire and solder it to connect the transformer’s ground wire to the coil beneath the plywood. Connect the transformer’s high‑voltage winding to the copper tubing’s tail, then link the tubing to the spark plug.
Attach the transformer’s remaining high‑voltage winding to one end of the battery holder, then connect the other side of the holder to the copper tubing’s end. This completes the Tesla coil–battery interface.
Plug the transformer’s low‑voltage winding into a mains outlet and switch on the power. Observe the charging process, ensuring all safety precautions are followed.