By Contributor | Updated Mar 24, 2022
Solar power is a reliable and sustainable solution for off‑grid living, boating, or emergency backup. After observing solar‑powered highway warning lights, I set out to create a compact, expandable solar generator that can be used on a boat, in a cabin, on an RV, or during power outages.
Start by estimating your energy needs. Add the wattage of each device you plan to run (radio, TV, lights, laptop, etc.) and multiply by the hours you expect to use them. For example, 50 W continuous use would require a 60 W panel array (four 15 W panels) and a 500 W inverter if all devices run simultaneously. Keep in mind that a larger battery bank and more panels provide headroom for cloudy days and future expansion.
A basic, expandable setup can cost between $700 and $1,000, depending on panel size and battery capacity. Key items include:
Links to purchase options are available in the resources section below.
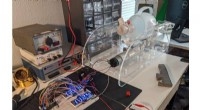
Place each deep‑cycle battery in the tote, aligning all positives together and all negatives together. Use 2 AWG copper wire and mechanical lugs to connect the terminals in parallel: connect the positive of each battery to the others, and do the same with the negatives. This configuration doubles the voltage capacity while maintaining the same amp‑hour rating per battery. Follow the detailed wiring diagram at eHow for visual guidance.
Connect the positive and negative leads from the battery bank to the charge controller’s battery terminals. Attach the solar panel array to the controller’s PV terminals, ensuring correct polarity. The controller protects the batteries from over‑charging and optimizes panel output.
Wire the inverter’s input to the opposite side of the battery bank (negative to negative, positive to positive). The inverter converts the DC stored in the batteries to AC for household appliances.
Place the solar panels outdoors in full sun, turn on the inverter, and run your devices. Monitor battery voltage and panel output to confirm the system is operating within safe parameters. Note how many hours the battery bank sustains your load—this will guide future expansions.
Because the batteries are wired in parallel, you can add more units to increase storage capacity. Likewise, a larger panel array will boost charging speed and compensate for increased load.
For more detailed plans and product links, visit my Solar Power Blog at https://solarpowerprojects.blogspot.com/.
Check out the full guide at https://solarpowerprojects.blogspot.com/