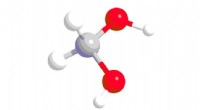
Build a tangible representation of an oxygen atom using everyday materials. This project is grounded in the standard atomic model—an oxygen nucleus contains eight protons, eight neutrons, and is surrounded by eight electrons. Follow the steps below to craft a clear, educational model that illustrates these fundamental components.
Refer to a reputable periodic table (e.g., IUPAC, Royal Society of Chemistry). Oxygen has an atomic number of 8, meaning it has eight protons and eight electrons. With an atomic mass of approximately 16, the nucleus contains eight neutrons. These numbers will guide the quantity of balls you use for each component.
Wrap a length of string around a pen and anchor the free end to the center of the foam core board. Pull the string taut and trace a smooth circle. Repeat to create multiple concentric rings if you wish to emphasize energy levels. The circles represent the paths the electrons follow around the nucleus.
Paint the larger Styrofoam balls: choose one color for protons (e.g., blue) and another for neutrons (e.g., gray). Once dry, glue eight proton-colored balls and eight neutron-colored balls together to form the nucleus. Affix this cluster centrally on the foam board, aligning it with the intersection of the drawn circles.
Using a fine‑tip marker, write a plus sign (+) on each proton ball to indicate its positive charge. Neutrons require no label, as they are electrically neutral.
Paint the smaller Styrofoam spheres (or leave them white) to represent electrons. Glue them onto the periphery of each drawn orbit, spacing them evenly. Mark each with a minus sign (−) to denote their negative charge. This arrangement will visually demonstrate the electron cloud surrounding the nucleus.
By following these steps, you’ll create a clear, accurate, and engaging model of an oxygen atom that reinforces core concepts in atomic structure and energy levels.