By Tricia Lobo – Updated Aug 30, 2022
The Bohr model, introduced by Niels Bohr in 1913, revolutionized our understanding of atomic structure by depicting a positively charged nucleus surrounded by discrete electron orbits, much like a miniature solar system. Building a three‑dimensional Bohr model is an engaging way to internalize these concepts and explore the arrangement of protons, neutrons, and electrons in a specific atom.
Consult a periodic table to find the atomic number and atomic mass of the element you wish to model. The atomic number (the smaller number) equals the number of protons and, in a neutral atom, also the number of electrons. The atomic mass (the larger number) approximates the sum of protons and neutrons. For example, beryllium has an atomic number of 4 and an atomic mass of 9.01218; thus it contains 4 protons, 4 electrons, and 5 neutrons (9 – 4 = 5).
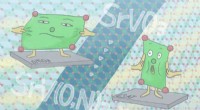
Separate your styrofoam balls into two sizes. Paint four of the larger balls a uniform color to represent protons, and paint five of them a contrasting color to represent neutrons. Allow the paint to dry completely.
Paint four of the smaller balls a third color to represent electrons, then let them dry.
Using toothpicks, cluster the painted large balls together to form the atomic nucleus. Arrange the protons and neutrons in any configuration that visually balances the model.
Cut two pipe cleaners into circles to serve as electron shells. Attach one electron ball to each end of a pipe cleaner, representing the electrons in that shell. Repeat for the second shell if desired.
Position the pipe‑cleaner orbits around the nucleus and secure each electron with a toothpick to the central cluster. For added stability, apply a small amount of glue to the toothpick junctions.