By Chris Deziel Updated Mar 24, 2022
toeytoey2530/iStock/GettyImages
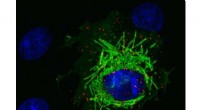
Staining a specimen before microscopic examination primarily enhances visibility, yet its benefits extend far beyond outlining cellular boundaries.
Certain dyes permeate cell walls, illuminating internal structures and enabling researchers to observe metabolic activity in situ.
Moreover, stains discriminate between viable and non‑viable cells.
Additionally, staining facilitates precise enumeration of specific cell populations within a given biomass.
Over 20 distinct staining reagents are available, each tailored for a particular diagnostic or research objective.
Staining accentuates cellular structures; selection of reagent hinges on the analytical goal.
The choice of dye depends on the specific feature you wish to visualize. Not all stains are compatible with living cells, but those that are—including Bismarck brown, toluene red, Nile blue, Nile red, and DNA‑binding fluorescents—are widely used in cytology and histology.
Some stains target spores, others highlight lipids or proteins, while a few change color in the presence of starches. For instance, a medical practitioner performing a PAP smear would apply Eosin Y, an acidic fluorescent dye that turns a bright red against red blood cells, cytoplasm, and cell membranes. Eosin Y is also routinely used in bone‑marrow aspirate analysis.
In many cases, a single stain is insufficient. Hematoxylin, for example, stains nuclei blue, and when paired with eosin it produces a contrasting red or pink background that makes nuclei stand out sharply. The combined hematoxylin‑eosin (H&E) stain is a staple in pathology for examining tissue architecture.
Gram’s staining procedure is a cornerstone of clinical microbiology, enabling rapid identification of bacterial pathogens. The technique employs a series of colorants that differentially stain Gram‑positive and Gram‑negative organisms.
First, crystal violet is applied, staining all cells a uniform violet. Next, iodine acts as a mordant, locking the dye into the thick peptidoglycan layers of Gram‑positive bacteria—typically Staphylococcus and Streptococcus—so the violet remains after decolorization. Finally, a counterstain such as Safranine O imparts a red or pink hue to Gram‑negative cells, creating a clear contrast between the two groups.
Specimen preparation can involve dry‑mounting, wet‑mounting, sectioning, or smearing. For most staining protocols, a wet‑mount is preferred: place a drop of distilled water on the slide, position the specimen, and cover with a coverslip. Apply a drop of the staining solution to a corner; capillary action draws the dye across the specimen. Placing a paper towel on the slide’s opposite side helps wick excess liquid, ensuring an even spread. Once the stain has fully penetrated, the slide is ready for microscopic evaluation.